Installing the R10 Newly chair rail follows a similar process to other chair rail systems, but with a few unique features specific to this model. Here is a step-by-step guide to installing the R10 Newly chair rail:
Materials needed:
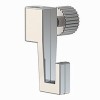
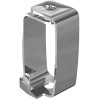
- R10 Newly Picture Rail
- Newly fixing clips (supplied with the rail)
- Screws and dowels (suitable for the wall)
- Drill with suitable bit
- Screwdriver
- Spirit level
- Marking pencil
- Hacksaw (if you need to cut the rail to a specific length)
Installation steps:
1. Plan the installation
- Determine the location of the picture rail based on the works you wish to hang.
- Draw a straight line on the wall using a spirit level to ensure perfect alignment.
2. Prepare the fixing clips
- Position the Newly fixing clips at regular intervals, generally every 30 to 40 cm.
- Place a clip about 5-10cm from each end of the rail.
3. Mark the drilling points
- Position the clips along the drawn line and mark the mounting hole locations with a pencil.
4. Drill and fix the clips
- Drill the holes at the marked locations.
- Wall type : Use suitable anchors if the wall is plaster, concrete or brick.
- Secure the Newly clips to the wall with screws, making sure they are properly aligned.
5. Install the rail
- Position the R10 Newly rail on the clips fixed to the wall.
- Press firmly to snap it into place. You will hear a "click" indicating that the rail is properly secured.
6. Check and finalize the installation
- Check that the rail is securely fastened and does not move.
- Insert the hanging wires and hooks to ensure the system is working properly.
Tips for a successful installation:
- Shorten the rail : If the rail is too long, cut it cleanly to the desired length with a hacksaw, then file the edges to avoid sharp edges.
- Wall Corner : If you are installing the track at a corner, use special fittings for a clean finish.
- Sufficient spacing : Leave a space between the track and the ceiling for easy installation and use.
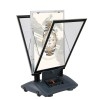
Once installed, the R10 Newly system offers an elegant and practical solution for hanging your artwork whilst ensuring a clean aesthetic.